VPS LOGIN
1)download puTTY.exe configuration by following link
http://www.chiark.greenend.org.uk/~sgtatham/putty/download.html
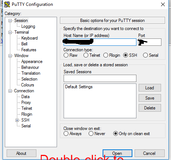
2)Run file which is shown Right side image
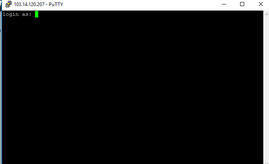
3)open cmd box with corresponding ip address with default SSH port
4)Login into VPS by given details
http://www.chiark.greenend.org.uk/~sgtatham/putty/download.html
2)Run file which is shown Right side image
3)open cmd box with corresponding ip address with default SSH port
4)Login into VPS by given details
CHANGE PORT NO
1)Login in to root with given password
2)Change directory to etc folder with cd /etc
3)cd shh
4)Edit config file with
vi sshd_config
5)Fild line port 22(default)
Remove the "#" and replace 22 with your desired port number
6)Save with ":wq"
7)Restart the service with service sshd restart
1)Login in to root with given password
2)Change directory to etc folder with cd /etc
3)cd shh
4)Edit config file with
vi sshd_config
5)Fild line port 22(default)
Remove the "#" and replace 22 with your desired port number
6)Save with ":wq"
7)Restart the service with service sshd restart
UPDATE OS
All package update using single command by
"yum update"
INSTALLATION
1)PHP install by "yum install php"
2)MYSQL install by "yum install mysql-server"
3)Webserver install by "yum install httpd"
4)Restart service by "service httpd restart"
5)Service start automatically when you restart by chkconfig
-->mysql service to start automatically by
-->"service mysqld status"(if on/off)
-->"chkconfig mysqld on"
-->"service mysqld start"
6)Php 5.6 Installation
-->Add repo in centos6 with "rpm -Uvh https://mirror.webtatic.com/yum/el6/latest.rpm"
-->yum install php56w php56w-common
Check PHP version with "php -v"
7)remove install php
8)Zip And Unzip file work by "yum install zip unzip -y"
9)Check the version of OS "cat /etc/redhat-release"
Cat -Read Only
10)uname -a (About kernel version)
11)MYSQL latest version installation (Refer below link)
https://www.tecmint.com/install-latest-mysql-on-rhel-centos-and-fedora/
12)Check MYSQL Version with "mysql --version"
13)PHP7 version installation process by
--> "yum install php70w"(7 installed)
-->"yum install php-mysqlnd"-to install PDO mysql extensions(solved php installation appears to be missing on vps wordpress installation)
14)Three method to check service is running or not
1)#service servicename status
2)Using scripts which are located in /etc/init.d by "/etc/init.d/cron status"
3)status atd
4)All service check by"#service -status-all"
WORDPRESS INSTALLATION STEPS ON VPS
Step1:Dowbload file with following command
[root@server]# wget http://wordpress.org/latest.tar.gz
Step2:Extract file with following command
tar -xzvf latest.tar.gz
Step3:Connect to your mysql to create db installation
mysql -u root -p
If no password press enter
Step4:Create wordpress database with following command
CREATE DATABASE WORDPRESS
NOTE:whatever you want instead of database name(wordpress)
Step5:create User with following command
CREATE USER wordpressuser@localhost
NOTE:whatever you want instead of user name(wordpressuser)
Step6:Set a password for your user with command
SET PASSWORD FOR wordpress@localhost=PASSWORD("yourpassword");
Step7:Grant all privileges to your db user using
GRANT ALL PRIVILEGES ON wordpress. * To wordpressuser@localhost IDENTIFIED BY 'yourpassword';
Step8: Refresh mysql privileges
FLUSH PRIVILEGES;
Step9:exit;
Step10:Rename wordpress sample config file using
mv ~/wordpress/wp-config-smple.php
~/wordpress/wp.config.php
Step11:edit the wordpress configuration file using
vi ~/wordpress/wp-config.php
Step12: press"i" on your keyboard to start editing
Now replace database name,user,password with the one you created earlier
define('DB_NAME','databasenamehere');
define('DB_USER','Usernamehere');
define('DB_PWD','pwdhere');
Step13:Now type :wq to quit and save
Step14:Move the extracted wordpress folder to your web directory using
mv ~/wordpress/ /var/www/DETAILS PROTECTED
Install WHM/CPANEL on your VPS
Step1:Install Perl
yum install perl
Step2:Go to your home directory
cd/home
Step3:Get latest installation files
wget -N http://httpupdate.cpanel.net/latest
Step4:Install files
sh latest(execute installation files)
Step5:Access WHM/Cpanel
https://serverip:2087
yum install perl
Step2:Go to your home directory
cd/home
Step3:Get latest installation files
wget -N http://httpupdate.cpanel.net/latest
Step4:Install files
sh latest(execute installation files)
Step5:Access WHM/Cpanel
https://serverip:2087
Creation With Redirect url
1)Open the Apache configration file by using
"nano /etc/httpd/conf/httpd.conf"
2)Below the configuration file
NamevirtualHost *:80
<VirtualHost *:80>
ServerName domain.com
redirect / http://keeplearn.weebly.com/
ServerAlias *.domain.com www.domain.com
ErrorLog /var/log/httpd/error_log
CustomLog /var/www/domain.com
DocumentRoot /var/www/domain.com
<Directory /var/www/domain.com>
ordr allow,deny
allow from all
</Directory>
</VirtualHost>
